 |
Kim's Project Page |
 |
|
Kim's Project Page |
|

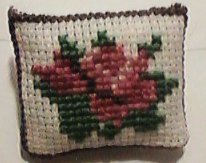 |
Needlepoint is a charming way to add a little warmth and interest to a dollhouse scene. This motif makes a lovely pillow, but who is to say that this is the only way to use it? Depending on what you stitch it on, you can make it into a rug, quilt or what have you.
The above picture is an approximation of what you will get. This was an early pillow, done years ago when I was still learning scale. It is done on 14ct fabric and with cross-stitch instead of needlepoint. If I had one of those fashion dolls, she would own it but since I don't it is in my stock of "early" miniatures.
Supplies
your choice of needlepoint cloth
This pillow will turn out in the following dimensions depending on the count of the fabric:
The one I am comfortable with is the 28ct, which would give you a pillow approximately 11inch by 9 inch in real life.
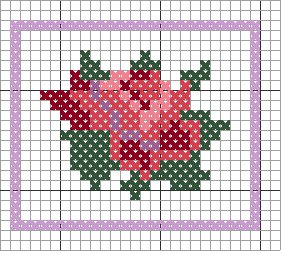
Colors
Of course, this is a pretty strong rose. If you want something a little more delicate, try three shades of pink, yellow, or color that goes with your vision. Just remember that the three colors have to be significantly different from each other. If you choose three colors that are simply a shade or two different, all you will get is a big blob of indistinguished color.
Appropriate cross-stitch needle
Embroidery hoop
Instructions
Cut a piece of cloth, generous enough to be able to fit comfortably into your hoop.
To prevent fraying, tape edges with masking tape.
To Stitch:
Only the central flower and border are stitched. The background is left empty. With a project such as this, it is easiest to start in the middle and work out. This way not only will you be less likely to miscount, but also the fabric won't get as warped.
With such a small pattern you can probably get away with a continental stitch. For bigger projects, a basketweave/tent stitch might be employed.
When starting an area of color, never ever make a knot. Instead, hold the thread in the direction of your stitches, and as you stitch the end will be anchored underneath. When finishing a color, again, no knots. Simply weave loose end back into your work.
Finishing
Cut Pillow front out, leaving at least 5 rows all around the border. Cut a matching back from fabric.
Press under raw edges of design fabric, one square from stitching. Do the same thing to backing fabric. When pressing, use a cloth over top of work to prevent scorching.
With wrong sides together, slip stitch around three edges. Lightly stuff pillow and finish slip stitching final edge.
Alternative method
If you hate stitching, follow finishing to just before the slipstitch instruction. Either get a thin width fusible webbing strip (made especially for hemming), or cut thin strips of fusible webbing. Pin pieces together, bond three sides together with iron. Stuff and complete the final bond.
Put your pillow on a bed or chair and enjoy your work!:)
"Rose" pillow copyright, March 1999, Kim Bulback, QOM